CheckEmoji Community · the emoji forum
🏠 Home 🆕 What's new ❓ Unanswered 🔥 Popular 📡 RSS Members 👥 0 online log in · register
Home › Jack Cook7 › Posts

Posts by Jack Cook7

796 posts shown.

How to connect to WiFi on Windows XP? in IT Support ·
My bad. What exactly even is a backend?

And how do you actually mount the Windows GUI to the kernel, starting from NT 4.0?
How to connect to WiFi on Windows XP? in IT Support ·
Nancy Thompson8 said:It’s honestly just like what you mentioned, my niece would probably only ever use a laptop for "lightweight web browsing without any video clips", and really nothing else besides that

There you go. Super simple.

Just get that LAN card ready (plug an ethernet cable from the laptop into the router), and you're golden.
How to connect to WiFi on Windows XP? in IT Support ·
Megan Thomas5 said:Honestly, it's garbage. There's zero point in even connecting it to the internet. Maybe you can use it to play Solitaire.

Writing stuff in Microsoft Word, throwing together some Microsoft Excel sheets, a few drawings, moving photos over from a USB drive, doing some light browsing without all those heavy videos and high-res images, checking webmail... it's actually a pretty useful machine.

If you ask me, you don't even need graphics in your browser—you could just get by with Lynx.
How to connect to WiFi on Windows XP? in IT Support ·
Nancy Thompson8 said:Oh, I totally forgot to mention one little detail—this thing is actually a laptop "Dell Latitude"
I’ll say it again though, the machine itself runs like an absolute dream and it's surprisingly snappy, so the only real headache I'm dealing with is the internet connection
Honestly, if I can just figure out how to get the Wi-Fi working, I’d love to pass it down to my niece to use, but if I can't get it sorted, I might just end up tossing it in the trash

Man, that thing is from 2004! It even comes with a service manual including the motherboard schematic and everything else. 👍 👍 🤣
https://www.eserviceinfo.com/downloa...itac_8640.html

No WiFi.

But, it DOES have an Ethernet card so you can easily plug it into a router—all you need is a Cat 5e patch cable of the right length.
How to connect to WiFi on Windows XP? in IT Support ·
Megan Thomas5 said:There’s even a modem lying around—plug it in and you can get IE6 running. Pure nostalgia.
Though, honestly, I don't think anyone actually uses dial-up anymore. There's probably nothing left to even connect to.

They still exist. 🙂
How to connect to WiFi on Windows XP? in IT Support ·
Nancy Thompson8 said:Look, I totally get it—it’s an old laptop, and if there isn't a network card tucked away inside somewhere, I'd probably just toss it in the recycling bin because honestly, it's not worth spending a dime to upgrade it.
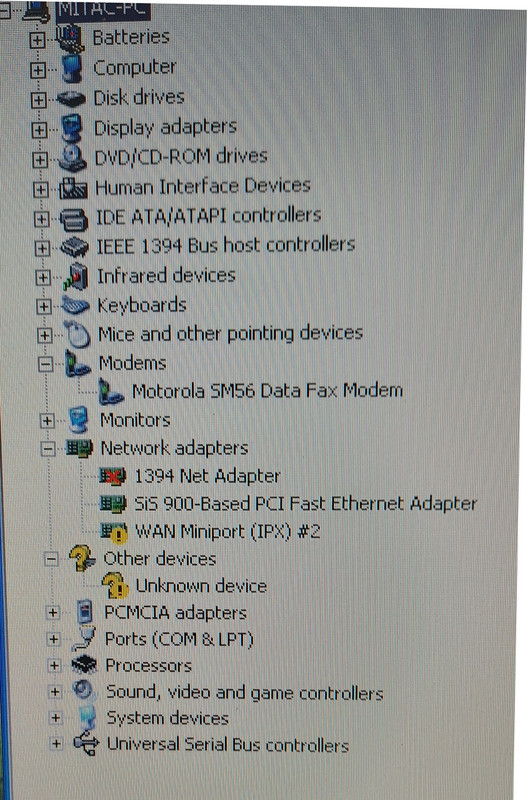
Based on what you've shared here, can we actually tell if it has a wireless card built-in or not? Everything else about the machine runs smoothly and feels pretty snappy, but this whole internet situation is just a massive headache.

image

Just go into the properties for that "Unknown device," grab a screenshot of the Hardware ID, and paste it here. Then we can figure this out.

Also, just a heads up—some older laptops had a toggle right in the BIOS Setup to turn things like Wi-Fi, Bluetooth, or infrared on or off. If that's turned off, Windows won't even see the hardware.
When you reboot, try jumping into the BIOS Setup and see if there's anything like that hiding in there.

That laptop definitely HAS a network card, and getting it online should be a breeze. A network card <> Wi-Fi.

What model are we talking about anyway?
RFID Card Reader DIY Project in Hardware ·
David Gomez6 said:Look, I’m totally aware of the trade-offs here... honestly, it feels like I should just build both versions and let the user decide which system they actually want. Besides, I’d probably have to prototype both anyway just to see how much juice they're actually pulling. Now that I've crunched the numbers, I realized an 80uA draw isn't even that big of a deal—I can definitely live with that!

Look, I'm not saying I'm gonna dive headfirst into this right this second... I'm just weighing my options, you know? Everything hinges on this because it dictates which direction I actually take with the whole project. I was just curious if I can actually bank on this being a solid choice, or if it’s one of those things that’s better off just scrapped entirely.

Yeah, exactly... that's how I tackle every single project. First, I map out the whole plan, break everything down into simple little steps, and then just knock them out one by one. No point trying to cram everything into my brain at once! 🙂
The heavy lifting—the actual thinking part—is mostly just staring at a blank sheet of paper. Once that’s done? It's all downhill from there. You just knock out the tasks one by one without having to stress your brain too much. 🙂

Looking at that list above, honestly? I feel like I’ve already cracked the code on a good chunk of it. I've pretty much got a solid plan for most of those.

I mean, honestly? I’m expecting this to be a total breeze since we're working with an ESP32 that's already got built-in memory. It should be a walk in the park!
3./4. Honestly, once I get this ESP32 fired up, I’m gonna have a blast messing around with the timing settings!
5. / 7.
Handling user authorization once I’ve grabbed that tag ID should be a breeze... honestly, not a huge deal. But what's actually tripping me up is the whole RFID authentication side of things. Like, how do I stop some random person from just scanning the card, ripping the data, and then making their own fake clone? Ugh, man... 🤔

Man, I almost totally blew this one! I was sitting here thinking the ESP32 would just keep track of the time while it’s in sleep mode, like, "no problem, right?" But then it hit me—I completely forgot to account for what happens when the battery dies. If that power drops out, the whole clock just resets itself. Total rookie mistake! 🙂 Alright... looks like I need to hunt down another component that comes with its own clock battery.

It falls under section 2... when I actually try to access the memory... honestly, it’s just an entry insertion.
I haven't really sat down to think about this one... but hey, once I get the Bluetooth communication up and running, it shouldn't be a huge headache to whip up a mobile app that lets me reconfigure all the settings on the fly. And honestly? As much as I'd love to say I could push full code updates over a wireless connection, I don't think I actually need to go there. Unless it turns out to be super easy—because man, if it's not too complex, why not just go for it? Why not have that power? 🙂

I'll probably just Google how that sleep/wake stuff works on the 10th or 11th.
Is there any actual reason not to bake this into the plan? Honestly, I’m just trying to get a ballpark idea of how much of a difference it'll make for the battery life—or if it’s gonna backfire and cause some other headache for us.

So, hey, if you could please give me a little hint on which direction I should be heading with this one:

Just keeping it brief.

Look, let me clear something up right now because people mix this up all the time: authentication is NOT the same thing as authorization. Seriously.

Authentication is basically just identifying who someone is, and honestly, it needs to be done securely if you actually care about your setup. Take RFID, for example. If you're just running a basic reader, anyone could walk up and wave some random compatible tag—say, a standard 125kHz one—right in front of it. Your reader would just go, "Yep, that's a tag!" and instantly save that ID to the disk. And let me tell you, that is a terrible way to do things. You can't just leave the door open like that! There has to be some kind of restriction on which specific RFID tag gets through and how it proves its identity. In other words, you need a protocol.

Once that ID is properly authenticated, someone’s gotta step up and decide if that person actually has the green light to, say, walk through the door. That whole part of the process? That’s what we call authorization.

It works just the same for your Wi-Fi or Bluetooth, logging into your Windows setup, or even just hitting up the forum login.

b) "sleep mode"

It’s basically like putting parts of your computer into deep sleep. You take all that data or current state from different components and stash it away in permanent storage—think CMOS battery, flash memory, or even a hard drive—so when everything wakes back up, it can just reload everything exactly where it left off. Otherwise, everything is just gone. Poof. When we're talking processors, we're looking at register contents; for memory, it's the stuff sitting in RAM. Then you’ve got a whole mountain of other components like UART, PIC, DMA, and MMU, which on an Arduino are usually just baked right into the same chip anyway. Peripherals are where things get a little tricky, though. It really comes down to how they actually talk to the processor—whether they're using I/O or memory mapping—and how they flag the CPU to say, "Hey, I've got data for you!" That's where the PIC (interrupt controller) comes in, letting the processor jump straight over to the specific routine needed to handle that peripheral's data.

c) solar battery charging
That can happen, but we gotta nail everything else first—especially sleep mode. That’s basically its own separate beast entirely.

d)
David Gomez6
how do I use the Arduino digital outputs to switch an element ON or OFF, like an RFID reader? Like, if I want to programmatically cut power to the RFID reader, I could do it the primitive way with a switch controlled by a servo motor. (Just being descriptive here, I'm guessing that's not how people actually do it, haha) ... what are my actual options?

I have a feeling I should be using a transistor for that, where a little voltage on the third "pin" decides if it conducts or not? Does that make sense... or is there a better way to handle this? There probably are ready-made relays for Arduino meant for this kind of thing, right?

I don't know all the gritty details, but it boils down to this: "someone" (the processor, aka the code) tracks time (ticks) for so-called "idle time" (when nothing is happening), and then at a specific predefined moment, it sends a command (a bit or a byte) to a specific IO port or memory location. That's tied to a relay or a transistor that controls the power for a device—which could even include the board itself.

d1) First off, how does the processor even know nothing is happening if it's running constantly? I mean, it has to stay active to monitor things, right? So you basically need a sub-routine that "does nothing" except check if something else *is* happening.

d2) Second issue: where and how do you stash all the necessary data when the processor goes to sleep, especially since it's spread across different parts of the computer?

d3) Third question is how to actually shut down a specific device. I don't know the specifics, but I think something was mentioned in that link I sent you about Arduino sleep modes, so let me go dig that up.

d4) Fourth question: how does an external event trigger the Arduino to "wake up."

d5) Fifth question: how do you pull that saved data from step (d2) back so the computer can pick up right where it left off? And honestly, do you even *need* to resume, or can it just reboot from scratch? For the kind of device we're talking about, starting fresh might be enough. Since this device is essentially "memoryless," it makes things way easier.

It's pretty obvious that "sleeping" isn't exactly trivial.
How to connect to WiFi on Windows XP? in IT Support ·
Nancy Thompson8 said:Wait, what do you mean it doesn't have WiFi?
I've got two other laptops right here in the same room, and they're both picking up the WiFi signal without any trouble at all.

That Windows XP laptop looks like it doesn't even have WiFi built-in. It does have an ethernet card, though—that SiS-900 one. You should be able to plug it straight into the router with a cable and be good to go.

Plus, it’s got (or used to have) a Motorola 56kbps analog dial-up modem.
RFID Card Reader DIY Project in Hardware ·
David Gomez6 said:👍

Just easing my way along. I can't actually open external links like that! My eyes aren't working on Google Photos links today, haha. Drop the details or just tell me what's going on in the pics—I'm all ears! What are we looking at? A crazy new build? Some fried components? Lay it on me! 🙂

I’ve just been messing around with this other RFID reader for now, mostly because I could actually track one down here in Washington, D.C. to run some tests. I haven't really dug deep enough to see what the actual differences are yet, but honestly? It looks like that "basic" one mentioned earlier is gonna be more than enough for what I'm doing.

Way to go! Nice work! 👍

Look, picking your reader—whether you're going with 128KHz, 10.56MHz, or whatever else is out there—isn't just about the hardware. You're basically deciding on the whole tech stack, the read range, how much battery juice you're gonna burn through, and even the price per tag. It’s definitely not some trivial "pick one and forget it" kind of thing!

Right now, I'm just using an Arduino Uno to test things out from my PC, but that's only temporary. Pretty soon, I'll be switching over to an ESP32. It’s got built-in Wi-Fi and Bluetooth, plus enough flash memory that I won't have to deal with the headache of messing around with an SD card module.

So, about that sleep mode stuff—it looks like I’m gonna be using a button to wake the whole thing up. Since this little gadget is running on a battery, saving power is basically my top priority right now. I did some digging and found that the ESP32 only pulls about 10uA in deep-sleep mode, which is totally fine by me. But man, the RFID reader? That's the headache. It says it draws 80uA just sitting there in idle mode, and honestly, that's way too much juice for what I need. I really need to get that down to somewhere around 10uA if this is actually gonna work!

Look, that fix definitely solves the power issues with the RFID reader, but it kind of kills how useful the whole setup actually is. Honestly? Having an RFID reader that "wakes up" the Arduino is way more elegant and practical—it’s just a total trade-off because the reader has to stay powered on constantly... unless, of course, you're planning on using active RFID tags.

As for the keyboard, I've still got that one thing left to tackle:
So, how do you actually get an Arduino to go into sleep mode?
2. So, how do you actually wake that thing up using a keyboard?
So, how do we actually use an Arduino's digital outputs to flip an ON/OFF switch for something like an RFID reader? Like, if I want to kill the power to the reader through my code, I could always go the "primitive" route and just have a servo motor physically slam a switch. (I’m being hyperbolic here, obviously—I don't think that's exactly the pro way to do it, haha!) ... so, what are my actual options?
I've got a hunch that maybe I should be using a transistor here? Like, if I hit that third pin with a little bit of voltage, does that decide whether it conducts or stays shut? Does that even make sense... or am I totally off base? Is there a better way to handle this? Also, I bet there are already those ready-to-go relay modules made specifically for Arduino for stuff like this, right?

(P.S. I'll just Google points 1 and 2 myself, but for point 3, I'm totally open to any advice!)

I sent you that link because, honestly, saying an Arduino "goes to sleep" isn't exactly accurate. Calling it sleep mode is a bit of a stretch—it’s way more primitive than that. It basically just hits an 8-second snooze, wakes up via software to check its registers, and then immediately crashes back into "sleep" again. It's got a few different operating modes, sure. They aren't technically part of the ACPI standards, but the logic is pretty much the same concept!

So, we were just geeking out over real-time clocks. The cool thing about them is that they’re totally independent if you set them up with their own power source. One of the best features is that you can program them to kick the voltage up on a specific pin every X seconds—which is perfect for triggering relays or whatever else you've got running. It's actually pretty similar to how you'd handle things with an Arduino.

I was thinking about adding a tiny little solar panel to top off the battery and basically cancel out that tiny power draw. How much of a headache is that going to be?
Do I need to worry about overcharging the battery with a small solar setup? Or can I just hook it up to the battery and let it trickle charge as much as it wants?

Whoa, hold up! You’re getting a little ahead of yourself there. There are plenty of pre-made modules that handle battery charging and discharging, but man, you gotta nail the basics first.

Look, you seriously need a game plan. Something like this:

1. The core build—Arduino, batteries, RFID reader, tag scan triggers the servo motor (you’ve already got this part down)
2. Logging the access data to an SD card.
3. Getting that data sent over Bluetooth/Wi-Fi to something else.
4. Setting up authentication for the Bluetooth/Wi-Fi connection.
5. Authenticating the RFID tag against the RFID reader.
6. A Real Time Clock that keeps ticking even after you kill the power.
7. Authorizing the RFID tag itself.
8. Logging all those successful and failed RFID auth attempts.
9. Remote access to the Arduino for firmware updates and reconfiguration.
10. Managing Arduino sleep/wake modes and controlling peripherals.
11. Using a button and/or the RFID reader as a wake-up trigger.
12. Solar battery charging.

Feel free to tweak the steps, but you gotta have a roadmap. Otherwise, you're just gonna wander around aimlessly and never actually finish anything.
RFID Card Reader DIY Project in Hardware ·
David Gomez6 said:Thanks for all of this!👍👍👍
I can't say I wrapped my head around everything all at once, but I'll be coming back to reread this stuff. 🙂

Regarding that thing you mentioned about RFID readers being passive... from what I can see, the market doesn't really offer many options, and this reader seems to be the one everyone uses.

Is that supposed to be the passive one?
...and would that mean that even as a passive device, it still runs on some tiny voltage where it pulls that declared "sleep current" of "<80uA"?

It says right there in the product description:

Quote:
Electrical parameters:
1. Operating current :13-26mA/DC 3.3V
2. Idle current :10-13mA/DC 3.3V
3. Sleep current: <80uA
4. Peak current: <30mA
5. Operating Frequency: 13.56MHz
7. Product physical characteristics: size: 40mm×60mm
8. Environmental Operating temperature: -20-80 degrees Celsius
9. Environmental Storage Temperature: -40-85 degrees Celsius
10.Relative humidity: relative humidity 5% -95%
11.Module interfaces SPI Parameter
12.Data transfer rate: maximum 10Mbit/s

Oops, I went off on a bit of a tangent there... typing too fast, I guess.

So, with RFID we’ve got two parts: the RFID reader and the RFID tag. Both can be active (powered up) or passive, but at least one has to be active so it can blast out a signal—basically an EM field that the tag needs to sit in. Usually, the reader is the active part and the tag is passive—meaning no battery. The antenna inside the tag catches that EM field, which induces a little voltage/current to power the chip, and then that chip sends a signal back to the reader to identify itself.

An active RFID tag actually has its own battery and broadcasts its own signal via its antenna, which boosts the range and adds more features (like for secure authentication and stuff).

The example you gave was a 13.56MHz RFID reader for Arduino. (That's an active one, obviously.) It draws power from the Arduino and needs to stay powered up so it can keep emitting that EM field for the tags to move through.

In the scenarios I was talking about, the RFID reader is always active, while the tag can be either passive or active.

In rare cases, you could make an RFID reader passive (no power supply), if, say, you don't want it broadcasting an EM field everywhere. In that case, the tag would have to be active.

Jack Cook7
You've got ready-to-go WiFi and/or Bluetooth modules with interfaces for a PC like USB-C, etc., just like those RFID readers; the real question is how they handle authentication on a phone. Bluetooth is definitely the easier way to go here.

David Gomez6
If I'm following you right, we could actually set up communication using a module that just has Wi-Fi. I'm gonna look into how much more of a headache that is compared to Bluetooth. lol

Yeah, the concept is pretty much the same, it’s just that Wi-Fi reaches way further (which means it eats up more juice) and there are way more options to play with. Basically, you've got the chip and/or an Arduino module for the Wi-Fi part. Like 802.11g—it's a bit old school, but totally plenty for what we need.
https://www.alibaba.com/premium/wifi...yAAEgJW4vD_BwE

David Gomez6
But wait, I didn't quite catch this specific part:
Quote:
Jack Cook7
The whole thing about waking up from, say, S1 to S0 is all about the event trigger. Since you're using a passive RFID reader, the voltage/current spike on the reader's interface after you wave a card has to be enough so that
a) the RFID reader stays powered up the whole time
b) the RFID reader buffers the data once the tag is scanned
c) the RFID reader triggers a wake-up sensor on the other side of the interface

The RFID setup needs to stay powered up constantly.
For (c) to work, the sensor needs at least a tiny bit of power.
- So I get that an Arduino can sit in sleep mode where it barely pulls any power (like 10uA)... I'll go with that, but I'm still a little lost on this RFID reader business.
I figured the card swipe would wake it up and then it could wake the Arduino, but I don't really get the requirements you laid out to make that actually happen.
Think of S0 (fully on) through S5 (completely shut down) as the different sleep levels for a PC. An Arduino and a Bluetooth or Wi-Fi client can hang out in sleep mode S1 or even S2 or S3, so they're sipping power instead of gulping it.

BUT, that RFID reader has to have power regardless of what the Arduino is doing. It's gotta be running full tilt all the time, unless you're going the route of using a physical button to wake the Arduino. A reader like that usually has a built-in buffer (usually about 1kB of RAM) that temporarily holds the data from the scanned tag, and at the same time, it sends a pulse over the bus (usually via serial I2C) to "wake up" the Arduino, which can take a second. Once the Arduino wakes up, it sends a signal to read that buffer (via serial) and clear it out. Could be RAM, could be Flash.

Of course, the Arduino needs to have a "sensor" on the bus where the RFID reader is attached so it can "listen" for that wake-up call. That's basically how all peripherals work on PCs—like when you touch a keyboard or mouse and it "wakes" the PC via the USB interface. That "sensor" needs some minimum power, or it can grab it from the RFID reader once the tag is read.

Generally speaking, the standard for sleep modes S0-S5, wake-up methods, and all that is ACPI.
These are the sleep modes for the Arduino.

Once the Arduino grabs the data from the RFID reader's buffer, it dumps everything onto a local micro SD card, kicks off a Bluetooth session to blast those details over, and then heads right back into sleep mode.

So, look—unless you’re going the route of using a physical button, that RFID reader absolutely needs its own buffer. It’s gotta be able to hold onto the tag info while the Arduino is snoozing.

You also mentioned the Arduino might need some kind of control or a relay for a stepper motor (?), which would probably kick in once a tag is successfully identified. That’s standard stuff for access control systems—I’ve seen plenty of off-the-shelf units used for things like office doors that have dedicated connectors for doorbells, relays, and all that. Basically, once the tag is cleared, they just send a pulse to the relay output or whatever trigger you've set up.

Just a heads-up though: reading a tag is one thing—that’s the easy part—but actually authenticating and authorizing it—basically checking if that specific tag is actually allowed through the door—is a whole different ballgame.
How to connect to WiFi on Windows XP? in IT Support ·
wiredcanyon94 said:Keith Garcia7

He put it right there in the title—he wants WiFi, not a wired connection. Honestly, there’s a good chance his machine doesn't even have a wireless card installed.

True, but why make things so complicated when you can just plug in an ethernet cable?

If the router is tucked away somewhere hard to reach, then yeah, you can go the WiFi route in a few different ways:
- A PCI wireless client adapter. Those are getting pretty tough to find nowadays.
- An ethernet-to-WiFi bridge adapter.
https://www.amazon.com/BrosTrend-600...118SPFCK&psc=1
- A USB WiFi adapter. He’ll just need to double-check which USB version his PCu supports, and usually, you have to grab the antenna separately.
How to connect to WiFi on Windows XP? in IT Support ·
Your PC already has a network card built-in (check under Connections, it's the SiS-900), so just grab an Ethernet patch cable and plug it straight into your router.

You can also go ahead and turn off "Service Advertising Protocol" and "File and Print Sharing for Microsoft Networks"
restlessdrifter12 said:It seems I wasn't being entirely clear in my previous message. Here is what I am actually trying to achieve:
I want to install an operating system—either Windows 7, 8, or 10—directly onto that external hard drive (the 500 GB one) so that I can run it on any computer I plug it into. For instance, if I go over to my sister's place and she’s running Windows 7, I could just plug in my drive and have my own OS boot up right from that external hardware.
The only reason I'm asking all these questions is because I heard a rumor that this was actually possible—essentially creating a sort of "portable" Windows environment.
A colleague of mine mentioned that I might be able to pull this off using a program called "Rufus".
I believe I've been much more specific now.

Whoa, okay, hold up. This is a totally different beast.

Man, I've dealt with requests like this plenty of times for all sorts of OSs. And it always hits the exact same wall—drivers. Even though Windows 7 comes packed with a ton of drivers, it's nowhere near enough to cover everything out there.

The best you can really hope for is setting up an installation on an external disk for a few specific types of machines you plan to use, and then manually installing the drivers for each one. There's no such thing as a "universal" installation. Even if you use generic video or audio drivers, you'll end up with a mess—like a video resolution of 1024 x 768 with only 256 colors, which nobody uses anymore. Plus, you've got the whole nightmare of the network card driver; if that doesn't work, you can't even get online to download the other drivers you need.

And honestly? You're gonna run into a bunch of other headaches.

First off, there's the license issue. Windows ties its license to the specific HW configuration. If you swap to a significantly different machine—say, a different motherboard—they'll block your license and start nagging you to enter a new one, sometimes even blocking Windows updates.

Then there's the disk partition mess. Since every computer has its own way of handling disks, partitions, extra drives like a DVD, or network drives, that external disk is going to show up as a different letter every time—anything from D: to G: (since C: is almost always the local drive). The result? The system might refuse to boot at all, even if you fix the boot order in the BIOS Setup. You could try finding some random neutral letter like O: (since F:, G:, H:, X:, Y:, or Z: are usually taken by network drives), but even then, you're still stuck trying to force the machine to boot from the O: partition on an external drive.

Maybe Windows 10 brought some improvements to this, but with Windows 7? Yeah, you're definitely not gonna have a good time.
Seriously, forget those online tutorials. They're useless.😠

I mean, if you've already got a working machine and an external drive on a USB, what's the point of even messing with a tiny USB stick?

Hey, restlessdrifter12. Can we just start from square one?
So, I think I finally get what they're trying to do here—they want to whip up a Windows 7 installation on a USB stick, so when you boot the machine from it, it kicks off the install process onto a completely different drive.

Basically, they're looking to turn a USB stick into a bootable version of a Windows 7 installer, kind of like how you'd use a DVD.
restlessdrifter12 said:Once I pull out the USB, Windows 10 starts booting up normally

?

Alright, let me see if I've got this straight:

1. You grab a different PC to make a bootable Windows 7 installer on a USB stick.

2. Plug that USB into your main machine—the one that already has a bootable Windows 10 on the C: drive—and give it a restart.

3. Hop into the BIOS Setup on that main machine, tell it to boot from the USB first, then restart again.

4. Boot from the USB, start the Windows 7 setup, and install it directly onto the C: drive over the current Windows 10.

5. Once everything finishes, yank the USB out, reboot, and Windows 10 kicks back in.

Am I hitting the mark here?
Seagate HDD died on me in Hardware ·
Good luck, man! Hit me up when you get the final result. 👋
restlessdrifter12 said:I’m honestly at a total loss here. I managed to get Windows 7 installed onto a USB drive—which, mind you, took quite a bit of trial and error—but when I plugged that USB into my other laptop running Windows 10, things went sideways. I specifically set the boot order to prioritize the USB, and after the restart, the "Setup devices" process actually began. It ran for about 20 minutes—quite a while, really—and eventually, the screen told me the computer was going to restart.
The problem is, once it restarts, instead of booting from the USB as intended, it just goes right back into Windows 10 rather than starting the Windows 7 installation from the USB.

Wait, what happens if you pull the USB out? How does it even try to boot then?
restlessdrifter12 said:So, I was just sitting here attempting to install Windows 7 onto a USB drive using the WinToUsb utility—an interesting little tool, really—when I hit a bit of a crossroads. Right in the middle of the process, it stops and asks me to pick between these three specific options:
1 MBR for BIOS
2 GPT for UEFI
3 MBR for BIOS and UEFI


I'm feeling a bit stuck—which of these should I actually go with?

It all really boils down to whatever machine you're trying to boot that drive on!

Look, if you're dealing with an old-school legacy machine that’s been kicking around for over a decade, then it only has a legacy BIOS. Period. So, basically... (1)

If your PC is basically brand new—like, only two or three years old? Then you're definitely rocking UEFI (that next-gen BIOS stuff), which means you're looking at GPT. Period.

If you're feeling a bit unsure about which way to go, just grab Option 3. It’ll work on pretty much any PC out there—though, fair warning, you might run into a few hiccups since it's still dealing with that old-school legacy MBR setup.
Issues with Apple AirPlay in IT Support ·
So, how exactly do you get your phone hooked up to Apple AirPlay?

https://support.google.com/chromecas..._topic=3447927